Showing posts with label Taxidermy. Show all posts

Wednesday, May 15, 2013

Barred Owl taxidermy: part III

This is my final installment of the Barred Owl taxidermy project I’ve been blogging about. Yesterday I left off with the Owl being wrapped in damp paper towels and being left in the refrigerator in the Taxidermy Lab until I could return to finish it.

Here are the links for Part I and Part II.

Taxidermy is a very TIME CONSUMING thing to under take. I’ve had very little experience with taxidermy, but I can say with authority that it is an art form, and a good taxidermist requires talent! Now, I’m not sure where I fall into this as a “taxidermist”, but I don’t think I did too badly.

Owl skin, foam body form, and fake
skull with painted beak and glass eyes attached.
Once I was able to get back into the lab, I had to deal with the Owl….seen at right. The wings and legs were all twisted so I had to sort of orient all the body parts being careful not to pull on feathers or poke holes in the skin. The body is just a foam piece, but even though I purchased it and it was listed as a “Barred Owl” it was WAY too big. Not all Owls are of the same size, but this was for a gargantuan Owl. I had to shave it down a bit and put it in the skin to get an idea of what size it needed to be. If I do this again, I’ll be SURE to take measurements of chest width and body length before I even make the first cut.

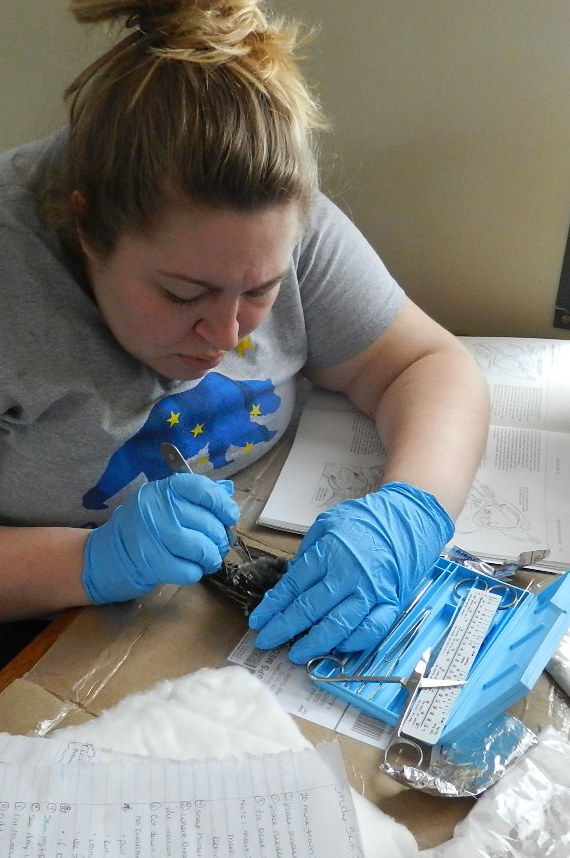
Barred Owl legs ready to be wired.
Before I inserted the body and head though, I had to attach wires to the legs and wings, so that I could position them.

An interesting find: the legs as seen above, I had to sever them right at the hip area. As you can see, they are not the same. One appears to be deformed, right? Here’s the scenario I came up with. This leg had been broken, but was not the cause of death. This break likely happened early in the Owl’s life, maybe even in the nest, and it appeared to heal. I don’t believe this deformity really affected the Owl’s quality of life, and grew to adulthood. Until it’s untimely unknown death.
Interesting to see though!

Also, the little bits of “stuff” stuck to the legs is sawdust. It’s probably left over from the tumbler, and didn’t get all blown off with the compressed air. But that’s ok, it soaks up moisture, which is a good thing!


Legs ready to be tied…”broken” leg on the right.
To wire the legs, I took a sharp pointy tool in my dissection kit (yep, technical terms here in this blog!) and poked a hole in the bottom of the foot, kind of on the heel. Sorry, I thought I had a picture of that! I then took a length of thin, but sturdy wire, and threaded it through the hole and up the back of the leg, careful to stay inside the skin.

Once it was threaded all the way in, and the tip of the wire JUST disappeared inside the foot, I began wrapping the wire to the bone to hold it all in place. I mounted my Owl in a flying position. BUT, if I was going to mount it on a branch, where it was standing, I’d leave several inches of wire sticking out of the foot, to use as a way to secure the bird to the stand.

Owl leg being reinforced with wire.
I did this for both legs, and similarly for both wings. The Owl then looked like this: Edward Scissorhands/roadkill.


Fake Owl skull and neck
made out of wire and foam
Next, I took a bit larger gauge length of wire, and used a different piece of foam to create the neck. I had to drill a hole into the skull to attach it.

A few drops of super glue in the hole helped keep it all together!
 
I positioned the fake skull in the space where it should be, and CAREFULLY threaded the wire down the neck. The skin is so delicate, and I had to keep wetting it to keep in pliable. With all the fat removed, it gets very papery when dry. Easy to rip.

I took the body piece next, and positioned the neck wire to insert into the foam.

Before I even began this project, I had to find an image of what I wanted my final product to resemble. I chose to do a flying Owl. So, the positioning of the neck was very important. If I had drilled the hole in the bottom of the skull, the bird would have been upright. But I needed to drill it in the back, so the “spine” would be straight. Below is the image I chose to mimic.

Photo credit: Ricka.org
The next three images are a progression of placing the foam body piece, wrapping the skin around it (like you might dress a doll…I know…morbid comparison), and then securing the wire ends.


Excess wire was trimmed, then bent over using pliers. I pounded them flush with the foam with a hammer, and then laid a THICK layer of hot glue over it all. This created a nice padding/buffer between the wire and the skin.

I was in the home stretch now…I just had to stitch my Owl up! Then I had a ton of positioning and preening to do. But the major WORK was almost done!

I must mention a very important step that I didn’t photo document. I DUMPED Borax in the bird before I stitched it up. And I mean dumped. Borax, for whatever reason, is really good at preserving the skin. And I dumped in probably a full cup of it, and shook it around in there, trying to coat all surfaces. The excess just stayed in there!

On the left I just began stitching the Owl, and on the right I’m almost done!
 
Ta-da!!!
Once that bird was sewn up, I was out of there! I was able to take it home with me to put the finishing touches on it. Altogether I think I worked on it for 12 solid hours. I think that was fairly quick though. I skinned and cleaned it very quickly, and worked very efficiently. Just be aware, if you were to take on a project like this, it’s quite time consuming. It’s totally do-able though, for an at-home project! As long as you are legally allowed to possess the animal, taxidermy is a really fun hobby.

Blow drying a dead Owl…yet another thing I never thought I’d ever be doing!
When I first brought the Owl home, it was looking pret-ty bedraggled. Birds are not meant to get wet…and we should all be glad haha! This majestic bird looked ANYTHING but! Blow drying really helped bring life back to the feathers.

Fully preened, hung, fluffy, and looking majestic: my final project!
Here’s my Barred Owl finished! I hope you enjoyed my semi “step by step” taxidermy tutorial. I never EVER though I’d enjoy skinning out and manipulating a dead animal. But it was very cool. I thoroughly enjoyed it, and I think I did this bird justice. He or she will now “live” out the rest of his days on display in the SUNY Cobleskill museum of specimens. Hopefully I did a good enough job of preserving it, so that it doesn’t deteriorate!

Thanks for following along!


Monday, May 13, 2013

Barred Owl taxidermy: part II

I’ve been such a blogging slacker over the past month or so. But, as of last Thursday, I finished my junior year at SUNY Cobleskill! It’s a lovely feeling to work hard and then be rewarded with good grades and a summer off!

In my last entry, My SECOND experience with taxidermy: part I, I began explaining how I came to prepare a dead Barred Owl (Strix varia) for a taxidermy project in the ornithology class I was in this semester. In this entry, I will walk step-by-step through the process.

Just a warning though, this is a little messy. Please stop reading if you’re squeamish!

The first cut! A classmate of mine (who didn’t wish to be shown) was giving advice on where to make the cut.
The Owl is laid on it’s back, and feathers are smoothed away from it’s belly area, which is difficult with all of the Owl’s feathers! Then with a scalpel (the sharper the better), I made the first incision from the base of the breast bone straight down to the vent.

In the picture above, the meat you see removed is tissue from the legs.
During and after the skinning process.
To get better leverage while skinning, I hung the Owl. Gravity worked in my favor, and also kept the feathers mostly clean of blood. The picture on the right is the entire “innards” removed. As you can see, it’s not much different looking than your Thanksgiving Turkey! The little bits stuck to it is sawdust, which helps soak up any moisture. But really, it wasn’t a gruesome process. Trust me when I say that too- I’m NOT into blood and guts what-so-ever.

I started removing the skull from the skin by pealing back the skin and rictal bristles around the beak.
With this Owl mount, it was really important to remove as much as possible of the gushy stuff to prevent rotting. Even the skull gets removed! I had to buy a fake Owl skull, eyes, and body form. I used Van Dyke’s Taxidermy Supply for the eyes and the body, and McKenzie Taxidermy Supply for the skull.


Owl’s are WAY less attractive when their faces are removed!
Size comparison between a real Barred Owl skull, and a false skull used for taxidermy.
 
I had to paint the beak with similar colors, and I attached the eyes with super glue in the sockets of the fake skull.
 
Once all of the innards were removed, and the skull…I was left with cleaned bones in the legs/wings, and basically just a floppy skin with feathers. At this point, it looked NOTHING like an Owl, and I was having a hard time imagining my end product.

So, into the sink it went. I gave the skin a bath with warm water and soap to remove any grease from the feathers that may have gotten on the feathers when I was skinning it.

An interesting find while bathing the skin. This part of the anatomy is called the uropygial or oil gland. This little nub is found on the bird’s back, just above the tail. It’s a sebaceous gland full of the oil that birds use to preen with. It is required to keep their feathers in working order and waterproof. It was neat to see, but gross when I accidentally squeezed it….
 
Into the paint thinner bath it went! Just a few minutes of swishing around and thoroughly saturating it. The paint thinner, I believe, is to remove any of the grease/fats that may have been missed in the water.

NEXT: The Owl skin went into the tumbler. This is a plastic drum that turns, and it’s filled with sawdust and corn meal. This is to soak up as much moisture as possible.

Post tumbler. This Owl does not look pretty.

The last step, before beginning to rebuild the Owl’s structure, was to use compressed air and blow out the feathers and much of the sawdust.
At this point, I had to stop for the day. I had been at it for about 5 hours, which really wasn’t bad I was told. Other students had taken much longer than I had to get this far, but I was on a tight schedule and I was very focused on getting this bird skinned on the first day of the week. Because there was probably 40-50 of us using the Taxidermy Lab, we were scheduled over 4 weeks. We each picked 1 week to work in the lab. We had to skin it out and get it re-stuffed in the lab, then we could take it home to preen it and finally mount it. But we HAD to be in the lab for the first part.

So, after that first day, I stopped after I blew the sawdust out of the feathers. I wrapped it in a damp paper towel, and left him in the refrigerator in the lab that night, to return the next day. In my next entry, I’ll outline the restructuring and stuffing process. And I’ll reveal the final project!!!

Thanks for following along this journey!


Friday, May 3, 2013

My SECOND experience with taxidermy: part I.

Back in February, for my first experience with taxidermy, I had to prepare a museum specimen mount of a European Starling (Sturnus vulgaris) as a project for my ornithology course I’m currently in. I did not grow up in a hunting household, so I was not desensitized to blood and gore as a child. I’m not ANTI hunting, I just don’t partake in it. So cutting open the Starling and removing all it’s innards was a challenge. I was faced with doing another taxidermy project…or “something else”. The something else was a project that I would have to come up with, and it would have to equal the amount of time spent preparing a bird mount. Plus a written paper. I mentally could not handle that at the time of the semester, trying to be creative and come up with a really GOOD project to rival beautiful birds mounted by other students. And, I was morbidly (well maybe not morbidly) interested in pushing myself to cut into another bird.

By the way, I should mention again and clarify how SUNY Cobleskill comes in possession of these birds. European Starlings are an invasive species that were brought over from…Europe, go figure. Having no natural predators here, their populations exploded and they often compete with and out-compete other native birds for food, shelter, etc. It’s not a good thing. Although they are pretty to look at, many consider their large flocks to be a nuisance. A lot of noise, and a lot of poop.
 
For this second taxidermy project that I completed, I was fortunate enough to work on a Barred Owl (Strix varia). Other birds I could have chosen from included: falcons, hawks, waterfowl, songbirds, and other owls. I chose the Barred because he is so handsome. I have fond memories as a child listening to them sing “Who cooks for you? Who cooks for you- alllllllllll?” from the trees. Listen here. And more recently I was very fortunate to get one landing in front of my camera trap- if only for a few moments.

They are a very common Owl, but because they are nocturnal, we don’t get to often observe them. Anytime I’m given the chance to handle a wild animal- dead or alive- I take the opportunity. So this Owl likely was hit by a car, or hit a glass window, or something like that. He was not hunted and killed by me or anyone, for the purpose of this project. And that goes for the rest of the birds that I could have chosen from. Many of these birds are protected by the Migratory Bird Treaty Act (1918), which is federal protection.
 
The Act prohibits, without a specific permit:
-pursuit,
-hunting,
-taking,
-capturing,
-killing,
-attempting any of the aforementioned,
-possessing any part of a migratory bird or it’s egg,
-selling/offer for sale,
-purchasing/offering to purchase,
-shipping/delivering for shipment,
-transporting/delivering for transport,
-or any other cause to be carried or transported
 
of migratory birds as listed here: Birds Protected by the Migratory Bird Treaty Act.
 
Permits can be issued in specific cases for: scientific research, captive propagation, incidental taking, or education. SUNY Cobleskill has the correct permits in place to allow the collection of protected species, and for students to learn from them. The way I look at it, these birds, who likely died by the indirect cause of humans, will not have died in vain if students like myself can learn from them post mortem.

Alright, enough of the boring and onto a few pictures!
My chosen Barred Owl, back and front PRE-taxidermy.


The Owls have a ‘zygodactyl’ toe arrangement: 2 toes in the front, 2 toes in the back. They also have the special ability to rotate their fourth digit to the front. This helps the owl perch, hold its food, and grab its prey.

For now, that’s all I can share. The next entry will include the first cut into the bird, skinning it, and cleaning the skin. It’s an arduous process, but well worth the effort. Stay tuned!

Tuesday, February 12, 2013

My first experience with taxidermy...

I’m warning you now- this is going to be a gross entry for some.

As a SUNY Cobleskill Wildlife Management major, the majority of my classes are very hands on. Our professor’s strive to prepare us “for the field” and the goal is to be “job ready” when we graduate. I’m currently enrolled in Dr. Losito’s Ornithology course. Ornithology: the study of birds.

Among learning approximately 150 bird species by sight and sound, I’ve learned general internal and external bird anatomy. My most recent project for this course was to prepare a study skin of a European Starling (Sturnus vulgaris).

The European Starling, as you may gather from it’s name, is not from North America.

A flock of starlings take off over garbage at the
Rapp Road Landfill in Albany, NY on January 20, 2011.
Photo credit: Lori Van Buren / Times Union
According to the All About Birds website, these birds were brought to this continent in the late 19th century, and only 100 birds were released in Central Park in NYC. As many introduced species go, they quickly take off and become invasive. There are an estimated 200 million now in North America ranging from Mexico to Alaska. Starlings are extremely adaptable, and in turn invasive. Thus, they are unprotected by NYS Fish and Wildlife Law. What that means is that you can harvest (shoot, poison, trap, etc) as many as you want, whenever you want. Part of their natural history is to gather in large flocks, often in the company of other “black birds” (Grackles, Red-winged Blackbirds).

The flocks can blacken the sky.

Each Ornithology student was given a Starling as their specimen to prepare. I suppose preparing the specimen could be considered taxidermy, but I want to make clear that I didn’t mount this Starling in a majestic pose with a snarl on it’s beak :) That’s left for more impressive animals like cougars and monstrous bucks.

Ok, now is when you want to stop reading of you are a little squeamish!

Ready to go: Starling and my dissection kit

So basically, what I had to do was remove the entire “innards” of the bird. Not just guts, but the entire inside. It was like unzipping it’s little “bird suit” and removing it’s coat.

Also, do I need to mention that this bird was already dead? I didn’t kill it, it was given to me frozen. A large nuisance flock was captured and gassed with CO2 to kill them. Instead of the birds going to waste, they were given to my college so that students could learn from them.

The first cut.

I have a brand new, very sharp dissection kit. I think this is essential when doing any kind of dissection or skinning. Although it seems counter-intuitive that you’d be safer with sharper tools, you’d be less likely to slip, and your cuts will be more accurate.

Severed leg bone from hip joint.
After the initial incision, I had to take a probe and well…probe around in the body cavity. There is a thin membrane between the skin and the organs that I needed to unattach. I worked towards both hip joints and “shoulder” joints at the wings. I had to sever these, so I could remove the body from inside the skin.

The goal was to have what looks like a mini turkey carcass, and a seperated loose starling skin which I would then stuff with cotton to restore the shape of the bird. Everyone knows what a Thanksgiving bird looks like, right? This was the miniature version!

Cotton on the severed ends of the humerus bones of the wing.

After severing and cleaning the tissue off both the legs, I worked my way up to the wings. In the picture you can see the cotton I used to replace the muscle mass of the upper wings that I removed. Without it, the wing may look deflated. With too much, I’d have a Popeye bird. Then the tips needed to be tied together so that when the bird was stitched back up, the wings didn't hang too loosely.

Cotton stuffing fills the skull cavity to maintain the shape of the bird's head.

I’ll spare the readers of this entry most of the gory details when it came to working on the head. It was disgusting. As I mentioned above, while I was removing the eyeballs (think size, color, shape, and consistency of blueberries- not fresh ones, but maybe frozen then thawed- a little loose in their skin), one POPPED and got onto my face and all up my arm. I had to walk away and take the dog outside for some fresh air.

I recovered, and was able to continue. Once all of the soft tissue was removed from the bird’s skull cavity, I stuffed it with cotton to maintain the shape of the head. I also removed the back half of the skull to have easier access to the “insides”. Also at the base of the skull I made a cut and officially freed the little “turkey carcass”, so now I had a limp Starling skin. Imagine taking the beans out of a Beanie Baby.
A Starling popsicle!

I also should mention that while I was working, I used corn meal and Borax to help preserve the specimen. Corn meal works great to soak up any moisture, although there wasn’t much. And the Borax helps to preserve the tissue that is left behind.

Once I got it all out, I had to reform the bird. I used the cotton, and wrapped it around a wooden stick. I had to play with it a bit, but I threaded the stick up through the neck (on the inside of the bird) and lodged the sharpened tip in the nasal cavity. The rest of the stick was wrapped with cotton, and I had to adjust it here or there to make sure the bird didn’t look lumpy.

After a bit of maneuvering, I was satisfied with how the bird looked, and stitched it up! Remember I had made the original incision that was a few inches long. It was recommended that we only needed 3-4 stitches, but I needed more. For my first time though, I think I did pretty well!

When I took this picture, I didn't realize the 'Peanut Gallery' was watching from below!

This is my finished bird! You can barely tell that moments before, this bird was excavated and inside out! I think I did a pretty neat job for my first time. I also preened the feathers a bit to make them lay flat and “natural”.

To secure the legs, I crossed them and tied them around the stick and I’m done!

These types of specimens are considered “museum specimens”. They aren’t the ones you’d see in a display case, but each museum, especially a natural history museum, has collections that aren’t on display. Museums are places where things are stored to preserve history and in this case, wildlife species are kept for documentation purposes.

The identification tag.
The last piece, and probably just as important as the bird itself, is some way to identify the species. Who knows, in 200 years maybe all European Starlings will be wiped out from New York. Without telling when, where, what this bird is- no one would have a clue as to what it is!

So in hindsight, it was not a HORRIBLE assignment, but I won’t be making a hobby of preserving dead animals either. Unless I’m really bored. I think that taxidermy is an art, and for those who take hunted animals and make them look realistic in dramatic poses- I respect that. I’m turning in my bird tomorrow, and I really hope that I did well. I do NOT want to have to redo this assigment! Once was enough for this girl.